If you’re interested in learning more about creating food videos, be sure to check out the SMTY Food Video Workshops! We offer hands-on as well as a digital course you can go through online to learn everything you need to know to create amazing food videos.
Also be sure to sign up for The Blog Village email list to get tips and updates delivered to your inbox!
First off, I wanted to say a real quick hello to everyone. This is the first official post on The Blog Village blog and I’m excited for everything to come. Now let’s get to it and stop messing around!
Okay, so what do I mean when I say Fast Motion Assembly Videos? You’ve most likely seen them on Facebook or Instagram, they are the videos that use high-speed footage to condense an otherwise lengthy process into a bite sized step-by-step walkthrough of how to do something. You’ll see examples of recipes, crafts, and more. I believe that we’re just starting to scratch the surface on these types of videos. Let’s look at an example:
So, why are these videos so good at GRABBING people’s attention?
No Sound Necessary
A lot of times we’re in a situation where we can’t (or shouldn’t) listen to audio and don’t have any headphones. Whether you’re on the bus, subway, in a waiting room, class, work, it doesn’t matter. These types of videos let you enjoy them without sound because there’s no dialog. All communication is done visually, often with on-screen text instructions. Music can be a big part of the tone, but they can survive without it.
Bite Sized
It’s difficult to get people to invest in a two, three, four plus minute video. TWO MINUTES! What!?!? Who has two minutes anymore. It seems crazy, but with our need for everything on-demand, attention spans have gotten shorter and shorter. What people have been conditioned for however is watching something for 30-60 seconds. Perhaps you’ve seen a few of these little things we call commercials before. Anybody.. anybody.. okay good. There’s a reason they’re all 15-60 seconds.
A Picture is Worth 1,000 Words
Nothing proves that more than these fast-motion assembly videos. You’re not only consolidating a good amount of information that would be contained in the instructions, but you’re giving your user 24-30 pictures every second to show them exactly how to do it. Powerful.
How?
The how is the part that I’m most excited about. If you have a DSLR or smart phone that was purchased within the last few years, you’re most of the way there. Not only that, but you don’t have to worry about what to say, how you’ll sound, making a mistake or how you look. It can be our little secret, but in the video above Jennifer and I were in our pajamas 😉 Shhh.
Our Setup
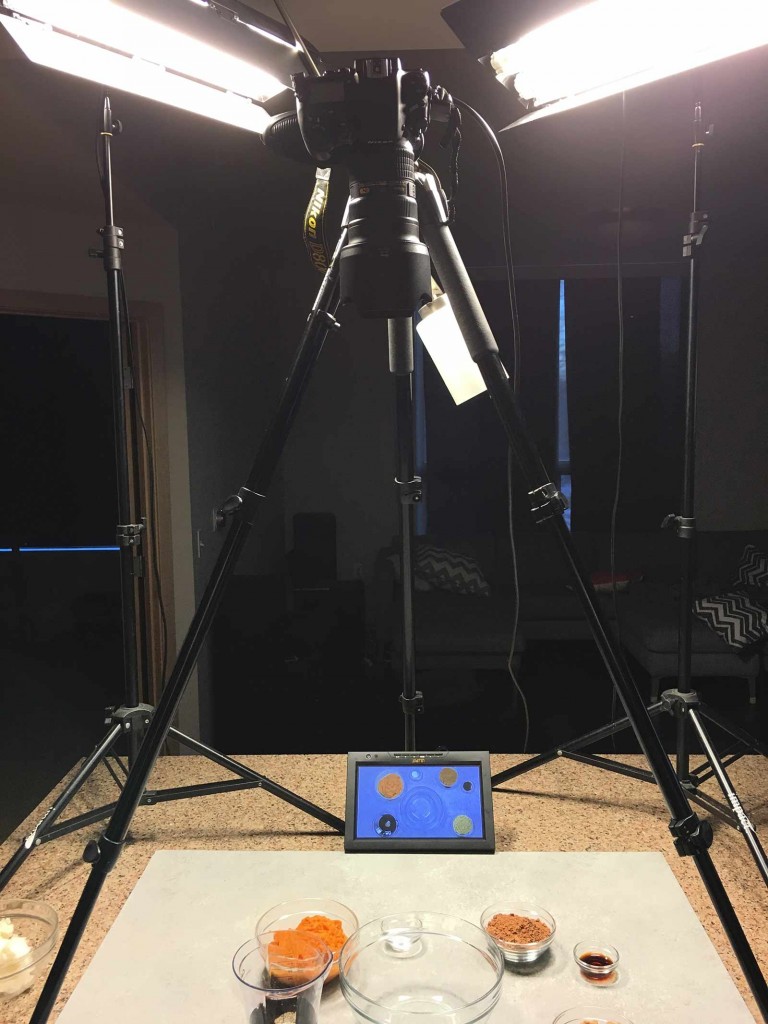
We’ve replaced the c-stand that you’ll see in the setup image below and now we just use our tripod that I mention below. I like the setup much better this way. It’s cleaner, more stable, uses less equipment, no need for sand bags etc. This is the setup that we’ll be using moving forward. I’m including an image of the reverse angle with the tripod instead of the c-stand below.
Disclosure: The below links are mostly affiliate links, all of the equipment mentioned is what we currently use. I appreciate the support!
Get ready for a lot of arrows!
(click image to view larger)
This was the setup used to shoot this video: https://youtu.be/FsqW4d5Tpjs
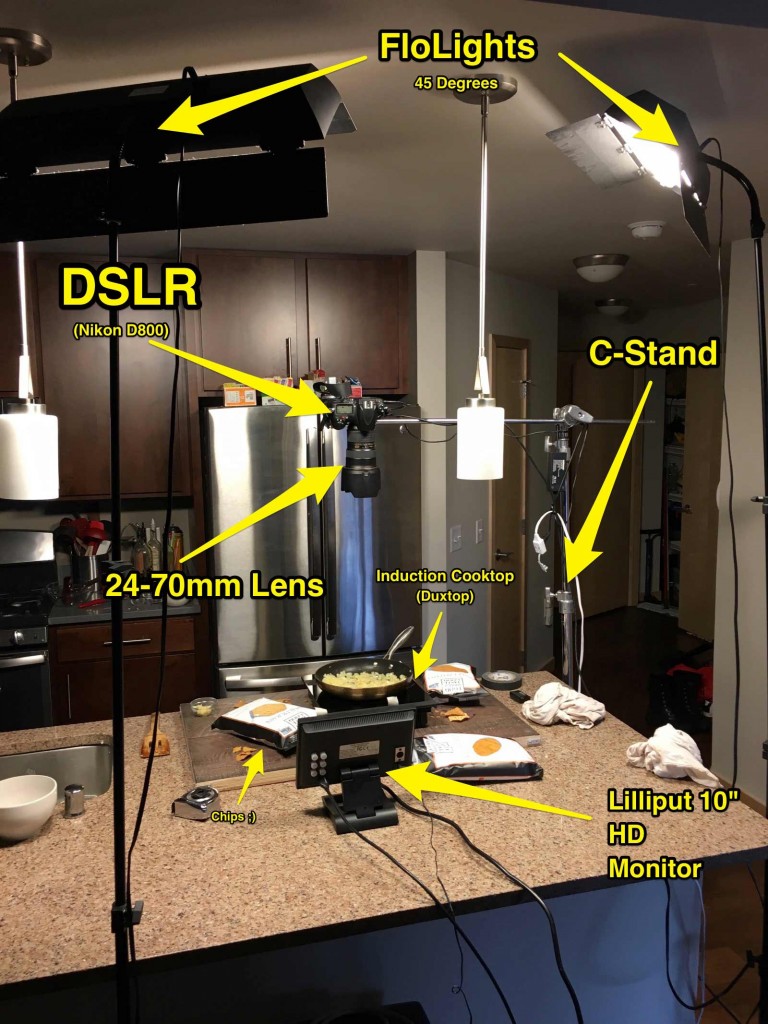
Reverse angle with lights moved up to countertop. We now use a tripod instead of c-stand and we’ve found this to be a MUCH easier and stable setup.
This was the setup used to shoot this video: https://youtu.be/zkApOaDJI7s
Here’s the equipment breakdown:
Lighting
2 FloLight lights with two Impact light weight stands. The Impact light stands are great because they’re small and cheap, but they are not the sturdiest of light stands. If you’re looking for something more stable (bump-into-able) I’d suggest spending more on a heavier duty stand.
You can find the FloLights at B&H Photo Video and it looks like Impact also makes something similar for a tad cheaper here
These lights are super affordable if you’re familiar at all with continuous light setups. They run around $170 and two of them can give you really professional results. If you’ve seen any of our other youtube videos where we are in the videos, these lights are providing all of the light. They’re great for overhead, FB Live, hosted style videos, etc. Very flexible.
Monitors
Lilliput 10″ Monitor
If you’re using a DSLR and want to see what you’re doing, you’ll want to have some type of monitor. If your camera has a swivel screen, that can work, but I like to have the screen right in front of where we’re shooting so it’s easy to see the framing. We’re using a 10″ monitor, but smaller would also work fine. Somehow this monitor was priced wrong on Amazon and I got it for $96 instead of $229. Yes, they’ve fixed it.
Tontec 7″ Monitor
These little guys are awesome. If I hadn’t lucked out with the Lilliput, these would be all I would use. We have three of them that we use to monitor the other three cameras when we’re shooting the videos where we host. AND, they’re only $69 which is crazy cheap for a monitor.
*Note: with all of these monitors, you’ll need to have the appropriate cable to connect to your DSLR. Typically this is a mini-HDMI -> HDMI cord. I suggest going with a 10ft length.
C-Stand (we no longer use this for overhead videos)
Matthews 40″ C-Stand
We have several 40″ Matthews C-Stands that are handy for shooting things like this.
Tripod
Manfrotto MT055XPRO3 with Horizontal Column
This Manfrotto tripod that has a 90 degree extender built in that lets you do just this, you can find it here. A lot of tripods don’t have the horizontal bar option which makes shooting directly down very easy.
Tripod Head
http://Manfrotto 327RC2 Light Grip Joystick Tripod Ball Head
You’ll also need a tripod head if you don’t have one. I like the joystick heads, they make it really easy to quickly position your camera exactly as you want it. This is what Jennifer uses when shooting photos for Show Me the Yummy as well as what we use for videos.
Camera
Nikon D800
We shoot with a Nikon D800, but any DSLR that shoots 1080p HD video works. We often use a refurbished Nikon D3200 that only costs $300 to shoot other angles while we’re filming overhead.
Lens
Nikon 24-70mm f2.8
I like shooting with a 24-70mm zoom lens because it allows us to zoom in and out to get our framing just right without having to adjust the c-stand.
We also use a Nikon 105mm f2.8 Macro lens for shooting closeup shots from a lower angle.
Cook Top
Duxtop 1800 watt induction cooktop
If you’re cooking, you may not be able to shoot over your stove. I’d never used an induction cooktop before we got this Duxtop, and it’s amazing. For only $90, you can cook and shoot anywhere. Not to mention that it heats up a pan in literally five seconds. Seriously, try it.
Shooting Tips
Format & Framing
Before you start, decide on whether you’re going to be shooting wide screen 16×9, which is what you see on TV and YouTube, or square which has some benefits for displaying on facebook and instagram.
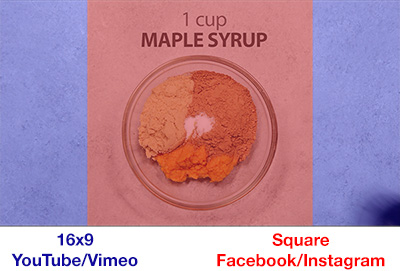
16×9
This is the easiest way to go. What you see while you’re shooting is what you get in your outputted video. It’s also what you’ll want to upload to places like YouTube, Vimeo, etc.
It gives you more screen real estate to play with, which you can use for styling and displaying sponsored products if you’re doing a sponsored post. A good example of that is a video we did for Food Should Taste Good, check it out to see what I mean.
Square
This takes a little more effort because you’ll have to crop the video in post and also keep it in mind while you’re shooting. It can help to tape off your monitor or put guides down on your table to give you an idea of what will be cropped. If you’re using a phone to film, there are apps that will let you film in a square crop which could help. I haven’t used any of them, so I can’t speak to them at this point. (I’ll put that on my list of things to test)
The reason that people are doing more square videos is because sites/apps like facebook and instagram are used vertically, so the square videos fill the screen quite a bit more than a widescreen video when viewing on a mobile device.
Think about the text
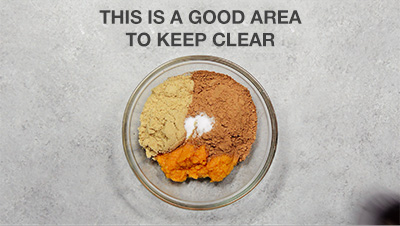
Inevitably, you’re going to want to add some text in post production to call out what’s going on in the video. Be sure to leave some area in the video for this. That can mean an area in a top corner or the top of the screen, but can also be on the actual dish that you’re cooking.
Conclusion
If you spend a little extra time planning, you can come up something that will work for both. Nice looking in widescreen, but all of the action is contained within the central square crop. It all depends on what your priorities are. If you’re solely focused on facebook and instagram, you may want to spend a little time figuring out how to go square. You’ll want YouTube to be widescreen or it will look strange to people on that platform. Here is a video on YouTube widescreen and on Facebook square
Have a Plan
It’s important with any video shoot to go in with a plan and an idea of what you want the end result to be. Even if you’re shooting the video by yourself, be sure you know exactly what shots you’ll be doing in what order. Pay particularly close attention to any steps that you won’t be able to undo and make sure you get them right the first time.
Sounds simple, but don’t forget that if you’re cooking anything on a burner, you can always turn it off and shoot things multiple times if you need to.
Lighting Consistency
This is where if you’re shooting with natural light, you’re going to run into some difficulty. I don’t want to blow your mind here with some crazy science knowledge, but we keep spinning around the sun and that means that natural light is always changing. What this means for your video is when you cut it together, you’ll see different levels of brightness and it won’t look as clean.
If natural light is your only option, hope for a cloudy day or a sunny day with indirect light and try to get all of your filming done as tightly as possible to minimize the change in light.
If you’re using artificial light, make sure you’re closing shades, blinds, doors, the darker the better if it’s daytime.
Shoot for the Edit
Shooting for the edit means that you’re not just shooting the process, you’re thinking about how it will go together once you’re editing the video. It also means giving yourself options.
Any time we shoot something that doesn’t involve an undoable action, we shoot multiple takes. In the video above, examples of this are my arms dragging across the screen, lassoing the video in and pointing to ingredients. The more options you have later the easier of a time you’ll have putting it together.
Something specific to these types of videos is also the importance of the placement of your tools/props. Be sure to keep in mind that if you want to be able to cut between two takes, as much as possible, items in the shot shouldn’t be disturbed and the camera should also not move. Often times this is easier said than done. Do your best and remember that at high speed, you’ve got more wiggle room than you would otherwise.
Take Your Time
If you’ve planned things out, you should be able to focus on shooting in small pieces.
Place ingredients into bowl, mix ingredients, pull bowl away, bring in another bowl. Each of these can be shot on their own with time in between to plan your next move. If your plan is in place, you can leave the camera filming and then cut out the gaps as you move from step to step later (this can also be a big help in preventing camera movement).
Have Fun
Play around with different ideas, get creative, a lot of times the little fun things that you add that have nothing to do with the actual creation of the recipe are what can make your video stand out.
And Finally… Mistakes Happen
In the video above, we got it perfect the first time mixing together the syrup, oil and vanilla. Wouldn’t it have been great if the camera was recording. DOH! Hey, s**t happens and I guarantee you it will happen, so go into each shoot with the best intentions but full expectation that something may go wrong. For me, expecting that something will inevitably go wrong makes it a lot easier to not get upset when it does.
Editing Tips
Music
I personally like to pick the music for a video before I begin editing whenever possible. More often than not, I find something within the music that I can use for effect that helps to add a little something extra that people may or may not realize makes it that much more special while they’re watching. If you watch the above video and pay attention to the music, you’ll see that a lot of actions and moments match to the music. I also like that it can give a sort of structure to the edit which helps to move the video along. That said, I’ve definitely added music after editing sometimes as well.
I really think that the music can make or break a video so don’t just grab anything and slap it on. This is probably one of the biggest mistakes I see. Keep in mind what you’re creating and what kind of tone you’d like the music to bring to the video. We use audiojungle.net which has tracks that sell in the $15-20 range, but there are other alternatives that are cheaper or royalty free.
Editing Programs
Alright, you’ve just shot your sweet video, you have the perfect audio track and now you’re ready to put it all together. Luckily you have a lot of options that range from free to moderately priced. As you can imagine as you move from free to paid, you get more features, flexibility and control. I’m not going to go through every application you can use here, but here are your basic options:
Mac
iMovie – Free, you can actually get some really good results if you take the time to learn the program.
Final Cut Pro – $299, you can do anything you would ever want to do with this.
Adobe Premiere – $20/mo with Creative Cloud for the single app or $50/mo for the entire creative suite. As with Final Cut Pro, this is a professional grade application that you can do anything with.
PC
(admittedly, I am not as familiar with the PC options, leave a comment below if you have suggestions)
Windows Live Movie Maker – Free, fairly basic assembly of videos.
Adobe Premiere – See pricing above, this can do everything.
iPhone/iPad/Android
iMovie is available on iPhone and iPad which again is fairly capable. I’m sure there are also options that you can find with Android if you’re planning on editing on your phone or tablet.
My Choice
I used Final Cut Pro for years on a mac, but now use Adobe Premiere because of Creative Cloud and how seamlessly it integrates with the entire Adobe Suite of tools (especially After Effects).
The Editing Process
When editing fast assembly videos, you want to keep it tight. The key is to keep something continually engaging your viewer. Here are some ways to do that:
- Speed it up: Okay, you got that part already, but be selective. My default is aiming at 150-200% for most of the video, but ramping up to 600-2000% for sections where a lot of mixing or other action takes place. During particularly long sections I’ll cut large chunks out, see below.
- Rough Cut: Put together your timeline with all of the Ins/Outs of each clips (the starting and ending). This will be really long, but you’ll want this as your foundation to edit with, especially if you’re laying down music first.
- Speed THEN cut: When you speed up a clip, you’re essentially removing frames. If you’re shooting at 24fps and speed that up 300%, you’re only going to see 6 frames. Because of this, it’s important to speed the video up first and then take the time refining the cuts. Otherwise you may end up getting slightly different results than expected.
- You don’t have to show everything you filmed: When the video is flying by at 600-2000% you can cut out sections to shorten things up without anyone noticing. I do this a lot during long mixing sections where the first half is important to see the mixing begin, but the last half doesn’t change much.
- Every frame counts: Cut at the frame right before your hands/objects actually leave the frame and cut back in the first frame you see your hands/object re-entering. It’s amazing the effect of just cutting out a handful of extra frames can have on the smoothness.
- Hit 100% for effect: A really nice effect can be dropping down to regular speed at certain moments. I like to do this when grabbing bowls and pulling them out or bringing bowls back in. Pick and choose and see what works for you.
Here’s what the final timeline for the example video above looked like to give you an idea of how it came together
(click image to view larger)
Effects
There are basically two types of effects:
Practical
Involves how you shoot and then cut e.g. pointing to all of the bowls then snapping fingers and all ingredients are in the bowl. This meant keeping all of the bowls stationary as we removed the ingredients and then cut to when they were all together. Other examples are: instantly melted butter/chocolate, passing your hand over an unmixed bowl and then it’s mixed.
Post Production
These can involve using keyframing and masks among other things to move text, objects etc. to create a more seamless and unique experience. In the example above you can see that in places like the pan being pulled down and back in. The text is masked as the pan reveals and then covers it. Same thing with the spatula.
Post effects definitely take more time, effort and experience but they can be used to great effect. There are a lot of tutorials online as to how to do motion graphics effects and they may be worth checking out if you’re interested in incorporating these techniques.
Text
Here are my tips for text, worth the read because a lot of people get this wrong:
- Make it large enough to be clearly read quickly. Things are moving fast, so small text can get lost
- Either shoot your video with a clear area where you can position plain solid colored text and have it be easily read OR if you’re putting the text over the food, it’s a good rule of thumb that there should be some stroke/border around the text or a decent amount of drop shadow.
- Keep it on the screen long enough to be read
- Play around with both popping it right in and animating it in, both can have different effects.
Color Correct
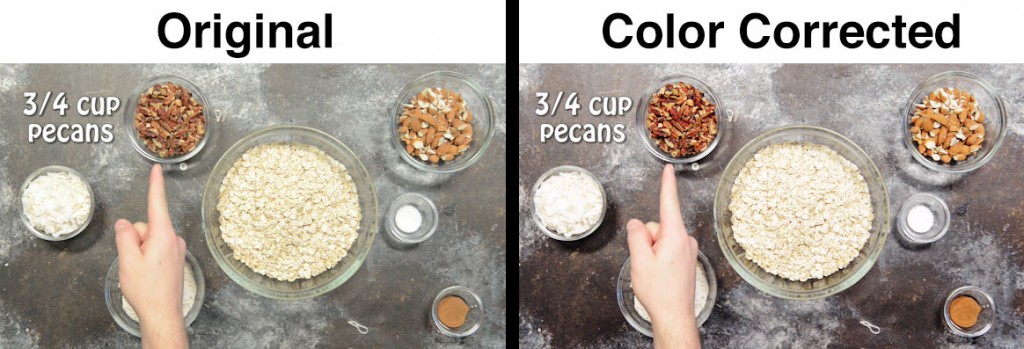
Just as important as with photos, you should most likely be doing some type of color correction on your video. This can range from adding some basic contrast to using an entire color correction effect to make things look better. In Premiere, I use the Fast Color Corrector effect and RGB Curves on every clip of every video we produce. The results can make a big difference:
Good Luck
Hopefully that points you in the right direction as you play around with this fun type of video. Leave any questions and comments below and I’ll be sure to get back to you.
Be sure to sign up for The Blog Village email list to get tips and updates delivered to your inbox!


Trevor, congrats on the new venture you have planned! It sounds like it could really help a lot of people. And thank you so much for this post! One of my goals for this year is to start creating some video content. You guys do it so well so it’s awesome to take a peak behind the scenes. I’ve pinned this to reference once I get some tanning bed lights like yours 🙂
Thanks Jess! You’re very welcome 🙂 Video can be a bit daunting, but totally worth it once you have a process in place. We’re planning on doing a behind the scenes video of one of the shoots so you can see exactly how everything comes together, so stay tuned for that!
I look forward to it! Awesome!
Awesome Trevor! Lots of good clear information here!
Thanks Ross, glad you found it helpful!
Do you have a link to the stands you use? Would love to use your affiliate on that too!
Hi Camille, that’s very nice of you 🙂 I updated the post to include which light stands we use and the link. Like I mention above, they’re pretty lightweight, so as long as you’re careful they’re great (don’t over-tighten). But if there’s traffic moving around the lights or if you want something more significant you may want to spend more. At that point, pretty much any light stand will do.
Also, do you have any good resources on learning adobe premiere? I bought it and literally have no clue how to even begin to use it. Imovie is very easy and intuitive, but adobe premiere…not so much. Thank you!
I’ll selfishly say, The Blog Village 🙂 (launching at the end of March) because there is a course where I walk through Adobe Premiere and how to edit these types of videos. Outside of that you can get a good start by heading to the Adobe site: https://helpx.adobe.com/premiere-pro/tutorials.html. That will get you familiar with how to use Adobe Premiere.
And sorry LAST comment, sorry! When you guys do shots of other angels (not overhead) are you shooting with another camera? or do you remove your camera and take those shots too. Any set-up pictures on how you do more than 1 camera or advice? Thank you! Just used your affiliate links to buy the monitor and lights.
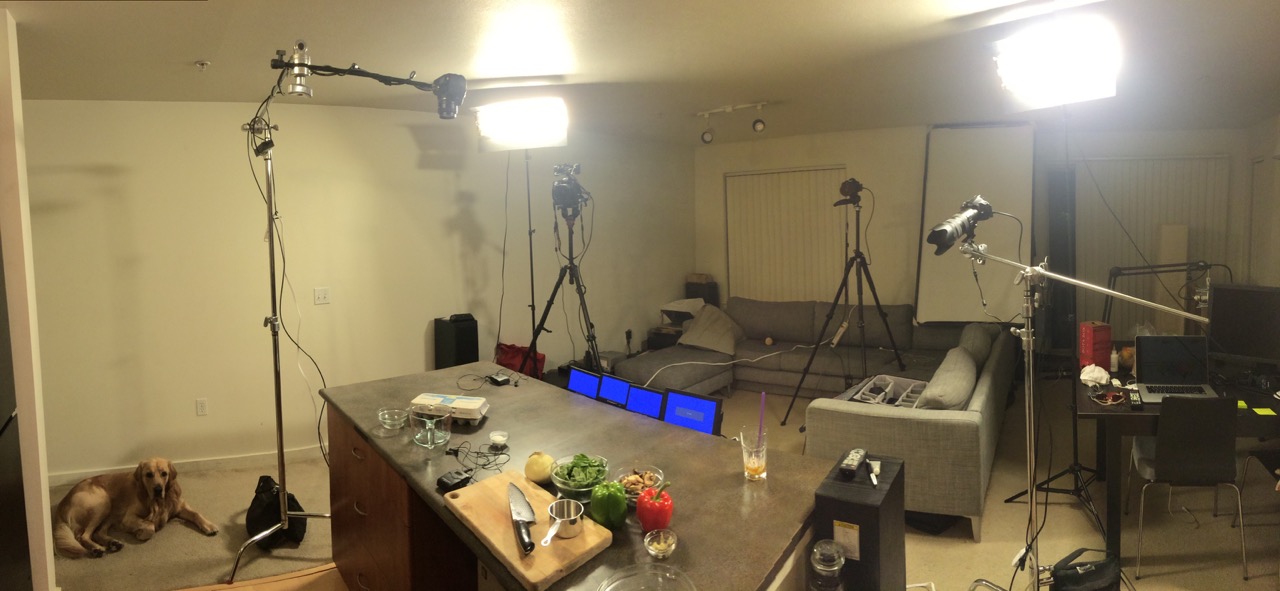
No worries, ask as much as you need 🙂 We have done both. When we first started shooting the on-camera videos we used a single camera which we would stop, move in for close up shots, go back and continue. You can also record a recipe twice when using a single camera one for the wide shot and one for closeups. We were shooting three videos per week for several months and so we upgraded to a four camera setup relatively soon because it made shooting a lot faster.
I’ll detail that setup in a later blog post, but here’s a quick shot of our old apartment with everything set up for a multi-camera shoot (Don’t miss Teddy in the corner 🙂 :
Thanks for the support Camille, and be sure to sign up to get on the email list for The Blog Village!
Can’t wait for the launch! Thanks for your help!
Amazing! 😀
Hey Trevor! Great info thanks! I’m excited for the blog village, it’s really going to be great! Can you give us some suggestions on the settings you use with those particular lights? ISO, shutter speed, aperture? Thank you!!
Hi Janae, of course! A shutter of 1/30th of a second, f5.6 and then ISO to reach the correct exposure. If the ISO is getting too high (over 1000) then I’d lower your f-stop or get the lights closer. The lights are pretty bright so you shouldn’t have trouble hitting those numbers.
Thank you! Best article yet!! Do you set white balance before filming? Even with the light set up I find the coloring changes thoughout the video and can’t figure out why. Thank you.
Hi Leisa,
I always do one of two things.
1.) Choose a white balance preset in your camera, if you’re using a DSLR you should have options with icons for daylight, cloudy, shade, flourescent, etc. With that set, your camera won’t try to adjust the white balance as you shoot.
2.) Set a custom white balance in-camera. You’ll have to look at your camera manual to see how to do this with your specific camera.
If you’re using a phone, I suggest purchasing an app that gives you more control over the manual settings when recording and lock your white balance within the app. For iPhones, I’ve used ProCam and it gives you complete control.
Also make sure you’re locking your exposure settings so that video stays as consistent as possible. With a DSLR this means shooting in Manual mode and on a phone it means either using a third-party app or on something like an iPhone you hold on the screen and it will lock exposure and focus.
Let me know if you have any other questions!
Wow!
I’ve found your site SMTY today through FBP community forum Trevor and The Blog Village through your income reports.
I’m very happy I did. I’m amazed by the amount of incredible information here and there!
Thanks indeed. I’ll be starting soon with my FOOD blog and would be implementing what you share here!
Love
Alejandra
Hey Trevor,
When you mention shooting tethered with a monitor, can you please explain a few more details about how you’re doing that? Are you using an HDMI cable? Then are you pulling it in through Lightroom? I can’t get my Lightroom to deal with importing any video, so I’m guessing there’s gotta be another way to do it.
Thank you so much! I’ve referenced and shared this post many times.
Jess
Hey Jess,
Yes, it’s running directly to a Tontec/Liliput monitor from the HDMI out of the camera. We shoot upside down which the monitor gives you the added benefit of just being able rotate it physically upside down. We then just rotate the video 180 degrees in post.
We record everything onto SD cards and then import into Adobe Premiere. There are ways to capture directly to your computer, but they involve using additional hardware to run the HDMI signal through and then compress. Expensive and not really worth it. If you just want to monitor what you’re doing on your computer, you can do it with Canon but even then I don’t like it. There’s a delay and it’s at a slow frame rate, so motion is blurry. If you’re shooting video it’s definitely worth the $60. I updated the link above (it was showing unavailable) to the Tontec one we use.
You’re very welcome 🙂 Glad you’ve found it helpful!
Hi Trevor,
Thanks for putting this useful post up! I bookmarked this page ever since you first published and I’m finally getting ready to do some overhead style video shooting!
I have a question though. Would this kind of tripod head (https://www.amazon.com/Manfrotto-MHXPRO-3W-Retractable-Friction-Controls/dp/B00IT0AMBU/ref=pd_sim_421_2?ie=UTF8&psc=1&refRID=ZJ0R39S5F9EN9S15RSBK) still work for what we’re trying to do? I will be buying Manfrotto MT055XPRO3 with Horizontal Column tripod but saw a package deal with the above tripod head. Thanks in advance!
Hi Sue! You’re so welcome 🙂 Yes, that tripod head should work! It’s all about they style of head that you prefer, there are some other packages with the joystick head as well. If you’re not sure, swing by a camera store… they should have various types of heads to try and see what you like.
HI Trevor! I loved this post. So helpful! I am getting ready to purchase a Tontec monitor (from your link of course) and I just want to double check that it will work with a Canon camera. I will be using an EOS SL1 (which requires software for tethering on my computer). The monitor will be for the second camera that I am adding to my setup for those close up shots. I currently tether to my laptop with my Canon 80D.
Thanks for any insight!
Hi Bailey!
Yes, any camera that has an HDMI output (pretty much all of them nowadays) will work with the monitor!
Hi Trevor! Thank you for this post. It gave me an overall idea of the process of recording a recipe video. Really helpfull. 🙂
Of course! So glad it helped!!